Pods
Pods are the smallest deployable units of computing that we can create and manage in Kubernetes. In terms of Docker, a Pod is similar to a group of Docker containers with shared namespaces and a shared filesystem.
Normally, we don’t create Pods directly. Instead, we create it using the controllers such as Deployment, DaemonSet, Job, StatefulSet etc. Usually, a pod will have one container running on it.
There are options to have multi containers pods. This is not recommended to have a multi-container pod however there is some use case which we need to go for this.
We will have a look at the most common types of pods here.
Different Types of Pods
Single Container Pod.
As the name implies it has only “one container per pod”. This is the most common use case in Kubernetes.
Multi Container Pod.
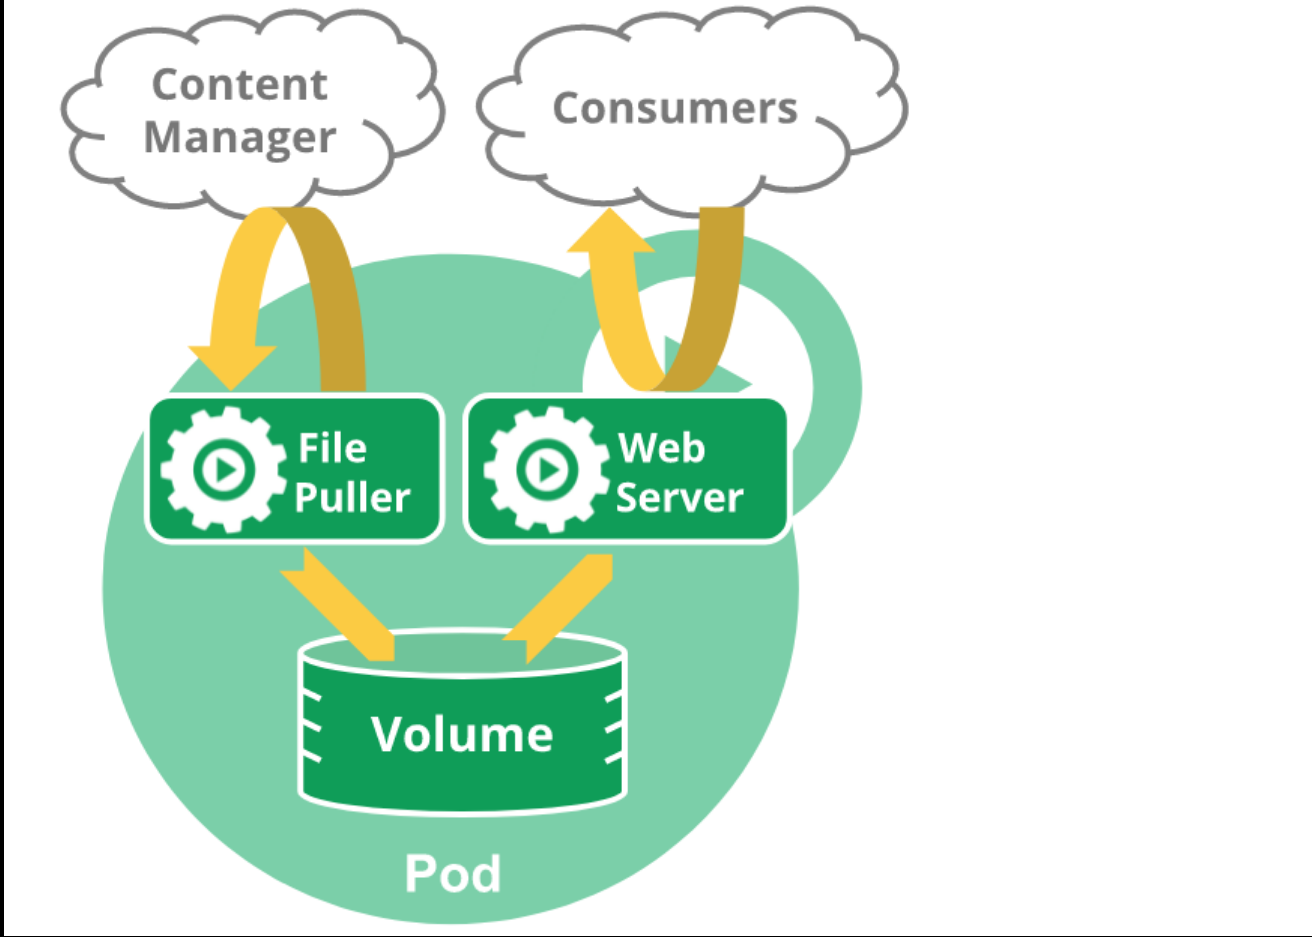
Pods that run multiple containers that need to work together. These pods share resources like filesystem and IP address.The primary purpose of the multi containers pod is to support helper applications that assist a primary application. There are many use case like,
- data pullers
- data pushers
- proxies
This figure gives you an illustration of Multiple container Pod.
Static Pod.
static Pods are managed directly by the ‘kubelet’ daemon on a specific node. These are not monitored by the control-plane components. Because of this, you can see that most of the control planecomponents are made up of static pods.
We will have a look at it shortly.
Init Containers
Init Containers are specialized containers that run before app containers. In a Pod. Init containers can contain utilities or setup scripts not present in an app image. We will have a detailed discussion of this in another series which is specifically talking about the PODs.
Creating a Pod
There are two methods to create anything in a k8s cluster those are,
- Using Imperative Commands
- Using Declarative methods
Creating the Pod Using Imperative Commands
We need to specify the name of the pod and the image with which the pod needs to be created.
rajith@k8s-master:~$ kubectl get pods
No resources found in default namespace.
rajith@k8s-master:~$ kubectl run my-first-pod --image=nginx
pod/my-first-pod created
rajith@k8s-master:~$ kubectl get pods
NAME           READY   STATUS              RESTARTS   AGE
my-first-pod   0/1     ContainerCreating   0          6s
rajith@k8s-master:~$ kubectl get pods
NAME           READY   STATUS              RESTARTS   AGE
my-first-pod   0/1     ContainerCreating   0          13s
rajith@k8s-master:~$ kubectl get pods
NAME           READY   STATUS              RESTARTS   AGE
my-first-pod   0/1     ContainerCreating   0          28s
rajith@k8s-master:~$ kubectl get pods
NAME           READY   STATUS    RESTARTS   AGE
my-first-pod   1/1     Running   0          57s
rajith@k8s-master:~$
Here the command “kubectl run my-first-pod –image=nginx “ icreate the pod named “my-first-pod” using the image “nginx”.
Initially, you can see the status is “ContainerCreating” from the logs I could see that it took around 42s to pull the image from the container registry. We will analyze this process in a later module. And you can see the container is running now.
Pod Definition file
Before going to the 2nd method we need to understand the Pod Definition file.
Empty defenition file.
apiVersion:
kind:
metadata:
  name:
Spec:
    # The container specification section starts here
   containers:
   - name:
     image:
    # The container specification section ends here
We will fill in the required information under the pod definition file.
apiVersion: v1
kind: Pod
metadata:
  name: my-first-pod
Spec:
    # The container specification section starts here
   containers:
   - name: my-first-pod
     image: nginx
    # The container specification section ends here
This is how a simple pod definition file looks like. In the previous method, we specified everything in the command line itself. Here we defined it under the pod definition file.
Creating the Pod Using Declarative method
List the existing pod
rajith@k8s-master:~$ kubectl get pods
NAME           READY   STATUS    RESTARTS   AGE
my-first-pod   1/1     Running   0          51s
The pod named “my-first-pod” which we created in the previous exersise is still running on this cluster, we can not have two pods with the same name in the same namespace. So deleting the pod.
rajith@k8s-master:~$ kubectl delete pods my-first-pod
pod "my-first-pod" deleted
Verify the pod definition file.
rajith@k8s-master:~$ cat my-first-pod.yaml
apiVersion: v1
kind: Pod
metadata:
  name: my-first-pod
spec:
    # The container specification section starts here
   containers:
   - name: my-first-pod
     image: nginx
    # The container specification section ends here
rajith@k8s-master:~$
Create the pod using the pod definition file.
rajith@k8s-master:~$ kubectl create -f my-first-pod.yaml
pod/my-first-pod created
Verify the status.
rajith@k8s-master:~$ kubectl get pods
NAME           READY   STATUS    RESTARTS   AGE
my-first-pod   1/1     Running   0          11s
rajith@k8s-master:~$
This time you can see the container creation was much faster. The reason behind this is the image was already available in the cluster. Which was downloaded during the previous exercise.
We will have a detailed discussion of this in another series which is specifically talking about the PODs.